Creating a New TxPROS Account?
- Click Create a New Company Account at the top of the page.
- On the New Company Account screen, enter all required company information.
- When finished, click Submit to save your information to TxPROS.
- If your account is created successfully, you will be redirected to the Login Page, where you will sign in each time you access TxPROS.
- If your account is not successfully created, contact the Motor Carrier Division (MCD) Permits Office for assistance.

Home Page
Click the Home button to return to the home page or Customer Dashboard.
Permit Wizard
Click the Permit Wizard button to start the Permit Wizard. This tool asks a series of questions to help determine which permit best fits the load you are moving.
Page Help
Click the “?” in the top right corner to view help information for the page you are currently using in TxPROS.
Section Help
Hover over ![]() to view guidance for the section you are working in. These help items explain the purpose of the section or clarify what information you need to provide.
to view guidance for the section you are working in. These help items explain the purpose of the section or clarify what information you need to provide.
Permit Notes
Click the Permit Notes button to add or view notes for the permit application. Both customers and Permits Office staff can enter and read notes related to the permit.
Expand/Collapse
On the Enter a Route page, you can expand or collapse the Enter Trip box to show or hide your routing points. To edit your route, expand the box and update the routing points as needed. Some reporting screens in TxPROS also include the expand/collapse feature.
Permits Panel
The Permits Panel provides a list of all active and expired permits for your company. It is also the starting point for beginning a new permit application.
Messages Panel
The Messages Panel displays important messages from the Permits Office.
Statistics Panel
The Statistics Panel shows basic information about your company’s Hub Closeouts and 1547 permits.
Administrative Panel
The Administrative Panel allows your company to view and update your account information.
Company Data
The Company Data button opens the Company Information screen, where you can add, edit, or delete items from your company assets.
Contacts
Anyone who needs access to TxPROS or who may need to be contacted by TxDMV during the permitting process should be added as a contact.
Adding a New Contact, Address, or Yard
- Click the Company Data button in the Administrative Panel.
- Click the New button next to the item you want to add (Contact, Address, or Yard).
- Enter the required information.
- Click Insert to save the new entry, or Cancel to discard changes.
- The new information will then appear in the appropriate dropdown list.
Company Users
TxPROS users are individuals authorized to log in to the TxPROS website and order permits on behalf of the company.
Adding or Editing Company Users
- Click the Company Data button in the Administrative Panel.
- Click the New or Edit button next to User.
- Enter or update the user information.
- For a new user, click Insert to save or Cancel to discard changes.
- For an existing user, click Update to save or Cancel to discard changes.
Vehicles
Companies may maintain a list of company vehicles in TxPROS. This list can be used to quickly populate vehicle information on permit applications.
Adding or Editing a Company Vehicle
- Click the Company Data button in the Administrative Panel.
- Click the New or Edit button next to Vehicles.
- Enter or update the vehicle information.
- For a new vehicle, click Insert to save or Cancel to discard changes.
- For an existing vehicle, click Update to save or Cancel to discard changes.
TxPROS allows customers to create oversize/overweight (OS/OW) permit applications for travel on state-maintained roadways in Texas. Most permits can be self-issued, while some require review by the Permits Office before they are issued.
Starting a Permit Application
- Click the New Permit link at the top left of the Permits Panel.
- If you already know the permit type you need, select I know which permit I need.
If not, select I need help choosing the permit to launch the Permit Wizard, which asks questions to identify the permit that best fits your load. - If you are ordering a permit for your own company, information saved in the Company Information screen will automatically populate the Order Permit page.
If you are a wire service ordering for another company, search for that company using the Search By box. - Select a primary delivery method (and an additional method, if desired) from the dropdown menus.
- If delivery information does not auto-populate, enter the required details.
- If it does auto-populate and you need different information for this permit, update the fields as needed.
- You may enter a Customer Reference for this permit. This optional field lets you associate a permit with a specific job, job number, or internal tracking code.
- If you use this option, you will be able to search by that reference and generate a report of all related permits.
- The reference will also print on the permit.
- Select the permit type from the Permit Type dropdown list. After choosing, the Next and Cancel buttons will appear at the bottom of the screen.
- Enter the permit start date by clicking in the Start Date box and selecting a date from the calendar.
- Click Next to continue or Cancel to stop the permit application.
- If your company if required to have a USDOT Number, it must be entered on the Operating Authority screen.
- Click Next to move forward or click Save and Exit to save your progress and return later.
Entering Vehicle and Load Information
- Enter the load information on the Vehicle and Load Information screen.
- If the loaded weight exceeds legal limits, click Enter Weights to enter axle weights and spacings.
- Provide axle dimensions and axle weights as required.
- Click Validate Weights and Close.
- Click Next to continue.
- The Enter a Route screen will appear.
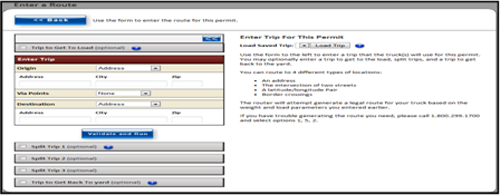
Entering a Route
- Select your origin and destination using any combination of specific addresses, intersections, border crossings, or latitude/longitude points chosen on the map.
- After making all routing selections, click Validate and Run.
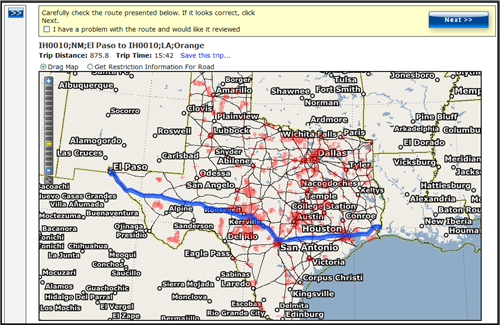
- Once the route appears satisfactory, click Next in the top-right corner of the map.
- Review the cost, route directions, and any notes related to the application. To view notes, click the Permit Notes button in the Navigation Bar.
- If documents need to be attached, click New Document and upload the PDF you want included with the permit application.
- Click Save and Exit to resume the permit application later or click Submit to pay for the permit or place it in your shopping cart. If Cash is selected, you must also choose the location where you will pay for and pick up the permit.
- Once payment is processed, you can click the permit listed under Permit Number to print the permit and driving directions. You may also return to the Dashboard and print the permit from the Permits Panel.
- If you placed the permit in your shopping cart, click the Shopping Cart button on the Customer Dashboard and select the permit(s) you want to pay for. After payment is collected, the permit(s) will be issued. Reminder: permits will remain in the shopping cart only until midnight on the day they are added.
- If a permit requires Permits Office processing, the Permits Office will place the permit in your shopping cart and you will receive an email prompting you to log in and complete payment. Once payment is collected, the permit(s) will be issued.
Resuming a Permit Application
- Locate the unfinished permit application you want to resume in the Permits Panel on the Customer Dashboard.
- In the Action column, click Select, then choose Resume Permit.
Editing a Permit Application
- Locate the pending permit application you want to edit in the Permits Panel.
- In the Action column, click Select, then choose Edit Permit.
- Make the necessary changes, then either:
- Click Save and Exit to continue later, or
- Continue through the permit application process.
Cancelling or Deleting a Permit Application
- Locate the pending or unfinished permit application you want to cancel in the Permits Panel.
- In the Action column, click Select, then choose Cancel Permit. The system will ask you to confirm the deletion.
- Click OK to cancel or delete the permit application.
Types of Routes
TxPROS can generate several types of routes:
- From one location to another
- From one location to another through specified via points selected on the map
- From one location to another along specified roadways
These options allow you to:
- Continue a loaded trip after traveling on non–state-maintained roadways
- Add a leg to the beginning of the trip for an unladen vehicle to pick up the load
Enter a Route Screen
This screen is used to enter key route details, including:
- Origin and destination
- Path conditions such as via points or preferred roadways
- Whether the route needs to include travel to pick up a load or return to a yard

Selecting an Origin and Destination
When generating a route, you may enter origin and destination information using:
- A specific address
- An intersection
- A border crossing
- A map-selected latitude/longitude point
Entering a Specific Address
- On the Enter a Route screen, in an Origin or Destination field, select Address.
- Enter the street address in the Address field.
- Enter the city and/or ZIP code.
- Complete the remaining origin and destination details.
- Click Validate and Run.
- The Trip Results screen will display your route.
Using an Intersection
- On the Enter a Route screen, in an Origin or Destination field, select Intersection.
- Click the Find Intersection link.
- A map panel will open on the right.
- Enter the two street names in the Street 1 and Street 2 fields. City is optional.
- Click Go.
- Zoom in and click the pushpin marking the correct location.
- The selected location will populate in the Origin or Destination box.
- Complete the remaining origin and destination details.
- Click Validate and Run.
- The Trip Results screen will display your route.
Selecting a Border Crossing
- On the Enter a Route screen, in an Origin or Destination field, select Border Crossing.
- Choose the appropriate border crossing from the dropdown list.
- Complete the remaining origin and destination details.
- Click Validate and Run.
- The Trip Results screen will display your route.
Selecting an Origin or Destination Using the Map
- On the Enter a Route screen, in an Origin or Destination field, select Lat/Lon/Map.
- If you know the latitude and longitude for the location, enter them in the Lat and Lon fields.
- If you do not know the coordinates, click the Find link next to the Lat and Lon fields.
- The Find Lat Lon on Map screen will appear on the right.
- Use the map tools (Zoom and Focus City) to locate the desired origin or destination.
- Choose the Select option.
- Click the location on the map you want to use.
- Complete the remaining origin and destination details.
- Click Validate and Run.
- The Trip Results screen will display your route.
Requesting a Route Review
After entering the origin and destination and clicking Validate and Run, you may request assistance with the route. To do this, check the box above the map that says I have a problem with the route and would like it reviewed. This will send your application to the Permit Office for review and assistance.
Trip Results
The Trip Results screen displays the route generated based on:
- The load information entered
- The permit type selected
- The origin and destination
- Restrictions on available roadways between those points
The Trip Results screen includes:
- Route Overview area
- Route Details area
- Load Dimensions used during routing
- Turn-by-turn driving directions